| |
----TUTORIAL 7---
Adding
More Polygons to our Scene
You will Need The NemoX engine Get it Here
download the Visual
Basic Source code here
we'll use the same BaseCode as the Previous tutorial.
Summary
1.
Setting Up
our world
2.
Game Loop Modification
In this demo we will make a simple city scene
with a road crossed from the south to the north, 5 buildings and 2 other
roads
1. Setting Up our
world
|
We have only to add more code on the buildgeometry procedure to do
that we will use some basic polygon
construction code offered by the
Nemo_mesh class.
To Add the geometry data to our Mesh class we do
it in 3 steps:
|
|
Step 1:Texture creation
We have to pass the textures we want to use for the mapping:
function to use
:Mesh.Add_Texture (texturefile)
return and integer that indicate the Texture index in
the current texture Pool
example in our builgeometry sub we use this:
Mesh.Add_Texture
(App.Path + "\Relief_8.jpg")
Mesh.Add_Texture
(App.Path + "\textures\facade2.jpg")
Mesh.Add_Texture
App.Path + "\textures\street.JPG"
Mesh.Add_Texture
App.Path + "\textures\street2.JPG"
Mesh.Add_Texture
(App.Path + "\textures\kerb2.jpg")
Mesh.Add_Texture
(App.Path + "\textures\kerb.jpg")
Mesh.Add_Texture
(App.Path + "\textures\square.JPG")
Mesh.Add_Texture
App.Path + "\textures\cement.JPG"
Mesh.Add_Texture
App.Path + "\textures\road_t03.jpg"
Mesh.Add_Texture
App.Path + "\textures\Asfalto1.bmp"
Mesh.Add_Texture
App.Path + "\textures\pierres.JPG"
Mesh.Add_Texture
App.Path + "\textures\win2.JPG"
Mesh.Add_Texture
App.Path + "\textures\windows.JPG"
Mesh.Add_Texture
App.Path + "\textures\StoreSd.BMP"
|
|
Step 2:Vertex buffering
The Nemo_Mesh class allow to add many simple polygon to the mesh
built-in vertex buffer:
here is a list of the methods:
        Mesh.Add_Box
        Mesh.Add_Cilynder
        Mesh.Add_Cone
        Mesh.Add_CorridorBlock
        Mesh.Add_Sphere
        Mesh.Add_Stairs
        Mesh.Add_Vertex
        Mesh.Add_VertexEX
        Mesh.Add_VertexFromPoly
        Mesh.Add_VertexFromPolys
        Mesh.Add_WallBack
        Mesh.Add_WallFloor
        Mesh.Add_WallFront
        Mesh.Add_WallLeft
        Mesh.Add_WallRight
        Mesh.Add_WallRoof
In this tutorial we use only :
        Mesh.Add_WallBack
        Mesh.Add_WallFloor
        Mesh.Add_WallFront
        Mesh.Add_WallLeft
        Mesh.Add_WallRight
        Mesh.Add_WallRoof
and Mesh.Add_Box to add vertex for a simple cubebox based tower
To make the towers in that demo we use this code:
Mesh.Add_Box Tool.Vector(-500, 0, 0), Tool.Vector(0, 500, 500), 1, 1, 1, 1, 1, 1
|
|
Step 3:Polygon classification
To
classify each vertice we have to call the Mesh class subroutines
Mesh.BuilMesh
Mesh.BuilMesh
'this will make and classify polygons,building
bounding box and Frustculling objects.
|
2.Game Loop Modification
|
'this sub is
the main loop for a game or 3d apllication
Sub gameLoop()
'loop untill player press 'ESCAPE'
Do
'=====Keyboard handler can be added here
Call GetKey 'go to the previous
tutorial for details
DoEvents
'start the 3d renderer
Nemo.Begin3D
'===============ADD game rendering mrthod here
'render the sky
Sky.RenderSky
'draw our city here
Mesh.Render
LENS.Render
'show the FPS at pixel(5,10) color White
Nemo.Draw_Text "FPS:" + Str(Nemo.Framesperseconde), 5, 10,
&HFFFF0000
Nemo.End3D
'end the 3d renderer
'check the player keyPressed
Loop Until Nemo.Get_KeyPress(NEMO_KEY_ESCAPE)
Call EndGame 'go to the previous
tutorial for details
End Sub |
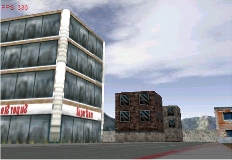
Here is a screenshot for our tutorial project
download the Visual
Basic Source code here
See you in the next Tutorial.....sincerly Polaris..Don't forget Any Bugs
detected mailMe
The PreviousTutorial 6 :Adding
Lensflare and glow effect
The Next Tutorial 8 :handle
with Collision detection |
|

